Shadowrocket User Guide
Follow the steps to add a server, choose a mode, connect, test, and troubleshoot. First establish a connection you can reproduce, then adjust rules and automatic connection settings.
Read the steps in order. If you have already imported your details, start at Global Routing. Screenshots help identify pages; the actual menu location may vary with the app version.
Add a server or import a subscription
iPhone and iPad: first make sure your entry appears in the SERVER list in Home, then choose a connection mode.
After opening Shadowrocket, stay on Home; there is no need to turn on the switch at the top yet. Existing connection details generally come in two forms: a subscription link containing multiple servers, or the protocol, address, port, and authentication details for a single server. These use different fields. Do not enter a complete subscription link as a Host, or paste a single server address into the subscription field.
Import an existing subscription with Subscribe
- Get the subscription link from your service provider and copy it in full. Check for spaces, line breaks, or extra text at the beginning or end, and make sure you have not copied only the truncated portion shown in a chat app.
- Open the subscription management option and find Subscribe. If you enter through Add Server, select a subscription type first, then enter your own link. Managing configuration files under Config is a different function from server subscriptions. A matching file extension alone does not mean the formats are the same.
- Save and update the subscription. When the request finishes, return to Home, expand the relevant group, and check whether the expected entries appear under SERVER. If you see the subscription name but no servers, check the update result first; do not keep toggling the connection switch.
Updating a subscription retrieves server details from a remote source; it does not establish a proxy connection. A subscription link may contain a personal access token, so do not post it in a public forum. When troubleshooting, describe the error without sharing the full link. If the update returns a webpage or login prompt, ask the original provider what the link is for rather than trying to fix it by changing Host or Port.
Enter details manually with Add Server
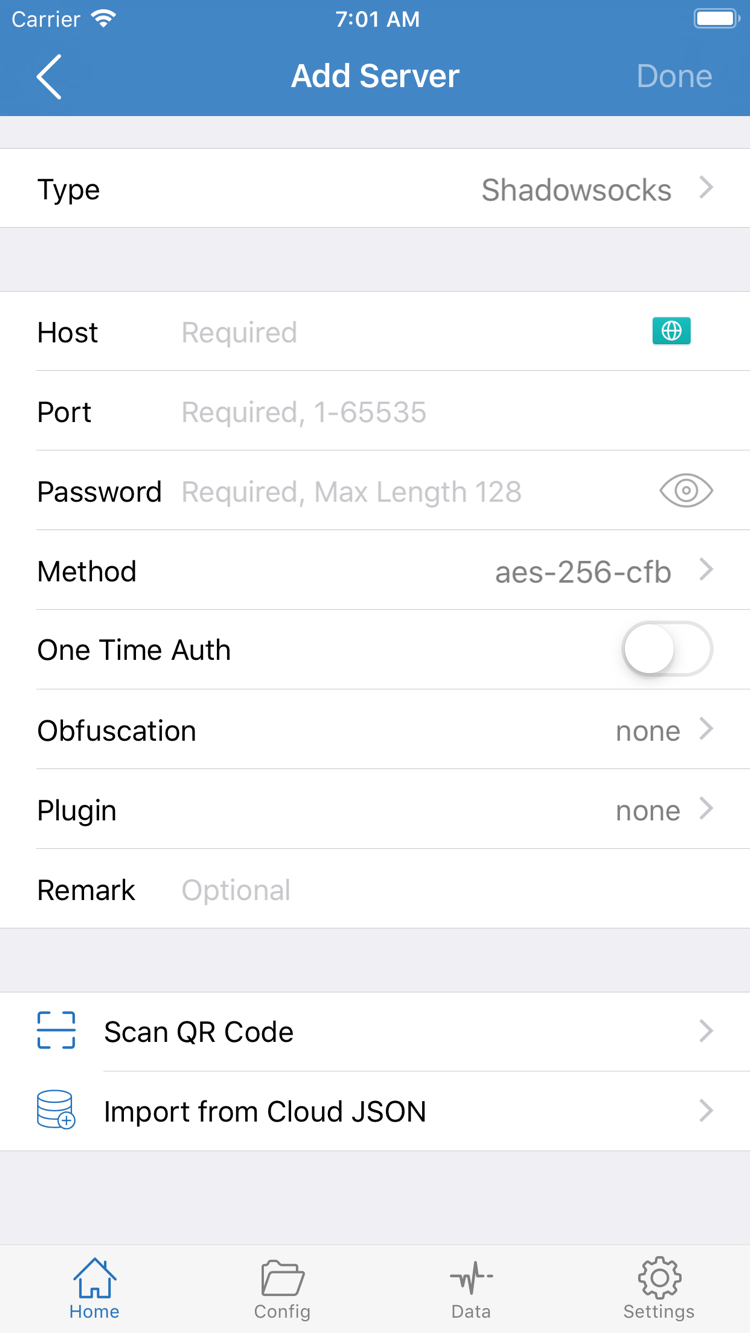
- Tap Add Server in the SERVER section of Home. Select Type first so the form matches the protocol in your existing details, such as Shadowsocks, VMess, VLESS, or Trojan. The fields shown can vary by Type.
- Enter Host, Port, and the authentication details required by the selected Type. Password and Method in the screenshot are fields for that form; they are not required for every protocol. Do not guess the encryption method based on experience with other setups.
- Check the details, save, and return to Home. If your details are in a QR code, use Scan QR Code. Import from Cloud JSON only supports details in the corresponding format; it is not a substitute for an arbitrary subscription link.
For example, example.com illustrates an address field but is not a usable server. After entering the details, check each field against the source. Choosing the right protocol but entering incorrect authentication details can still cause timeouts or dropped connections. Once the entry is saved, continue by choosing Global Routing.
Choose a Global Routing mode
iPhone and iPad: the server determines where the connection goes; Global Routing determines how requests choose a policy.
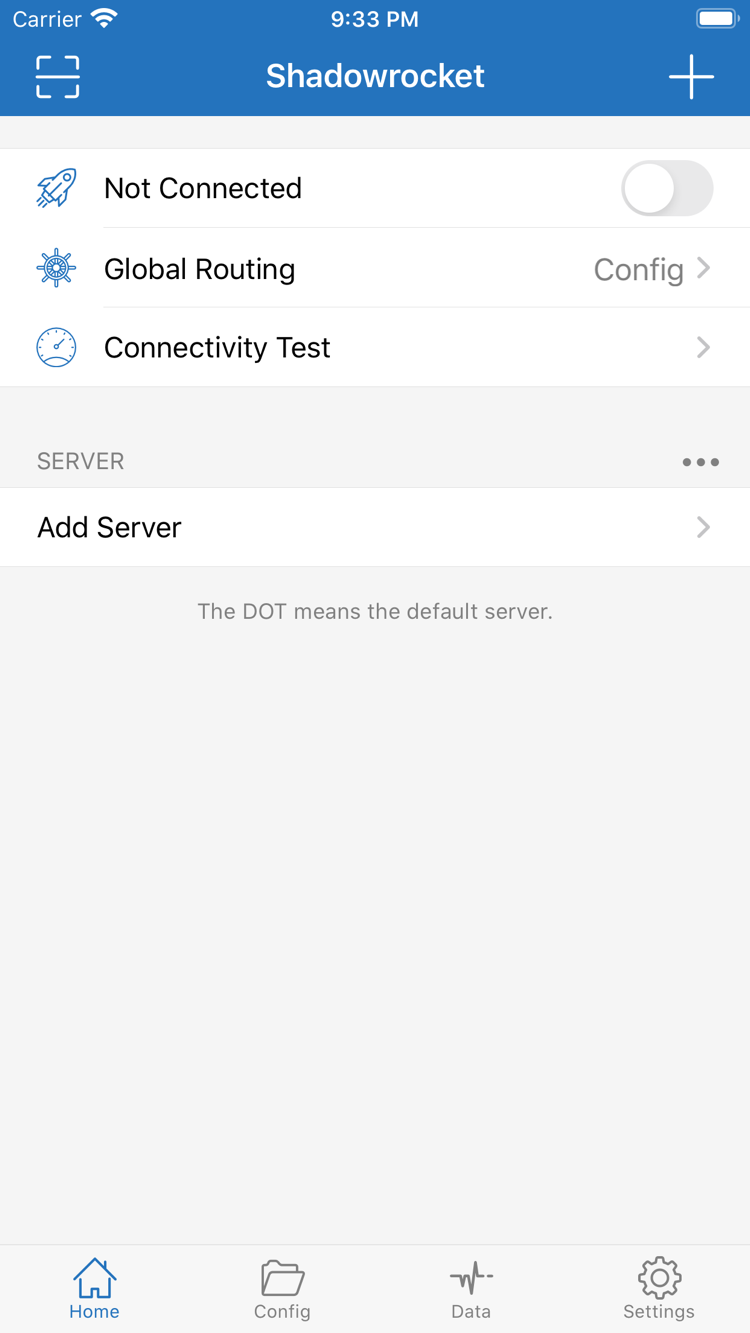
Return to Home, open Global Routing, and check the selected mode. A common point of confusion during initial setup is the difference between having a server entry and routing all requests through that server. The former means the connection details are saved; the latter also depends on Global Routing and the current configuration. Decide what you want to test before choosing a mode to reduce variables during troubleshooting.
- Config: Requests follow the rules in the currently enabled configuration. Use this for routing by destination, and first confirm that the required configuration is selected. Importing a server subscription does not automatically provide a rule file suited to your needs.
- Proxy: Use this to test the selected proxy server's connection. It can help distinguish a server connection issue from a rule selection issue, but it does not guarantee that every app or connection type will work.
- Direct: Requests use a direct connection. This can serve as a comparison with your normal network state; successful access in this mode does not show that a proxy server is available.
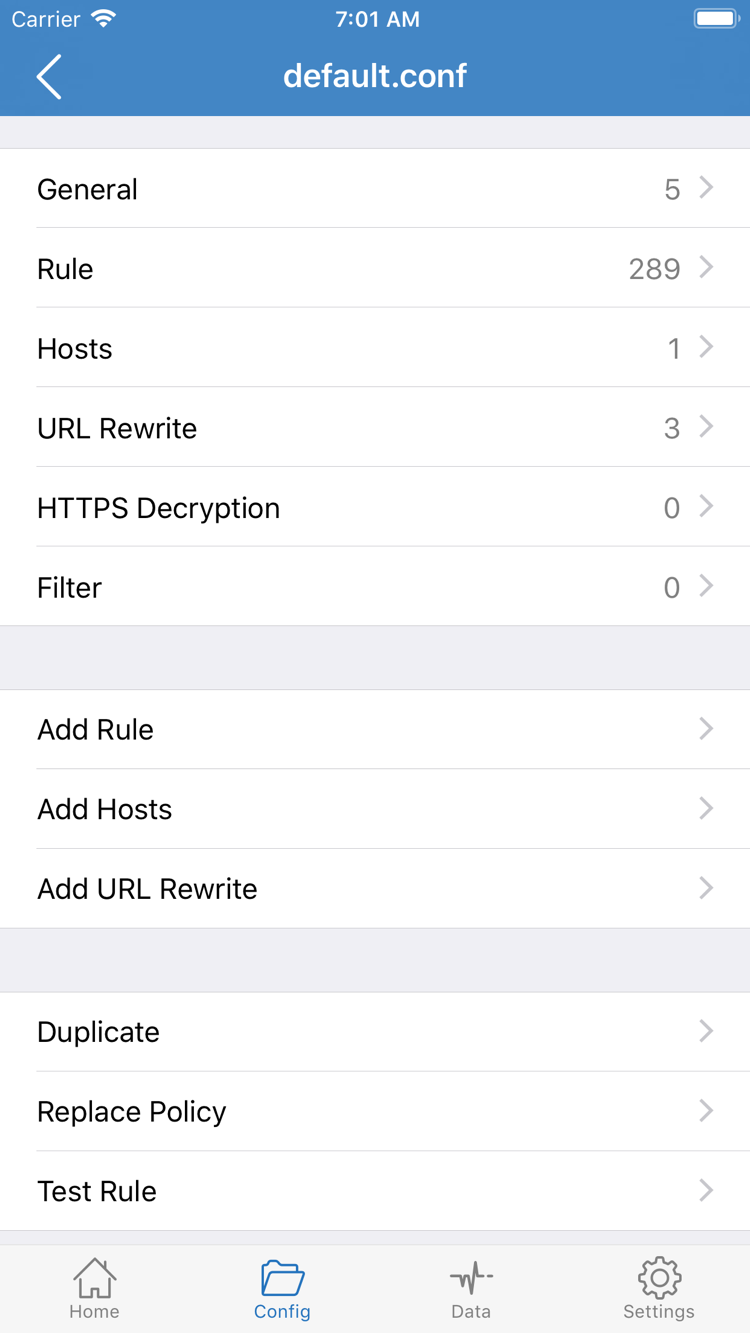
After choosing a mode, return to Home and check that the Global Routing row shows the expected value. To use rules over time, open Config and find and enable your configuration file; open the editing page when you need to view its contents. General, Rule, Hosts, URL Rewrite, and HTTPS Decryption in the official screenshot are configuration sections. Add Rule adds a rule; it is not where you add a server.
Check the existing rules under Rule first; there is no need to add a rule just to make the first connection. Rules are generally matched from top to bottom, so an earlier match can affect subsequent decisions. FINAL is used as a fallback at the end. The example below illustrates the syntax; it is not a complete file to replace your personal configuration. PROXY requires a corresponding available proxy policy, DIRECT means a direct connection, and policy names must match those defined in the current configuration.
DOMAIN-SUFFIX,example.com,PROXY
IP-CIDR,192.168.0.0/16,DIRECT
FINAL,PROXY
There is no need to adjust DNS, URL Rewrite, or HTTPS Decryption during initial setup. Keep the known configuration and check only Global Routing to make the next result easier to interpret. If a rule keyword is unclear, see the glossary. For detailed matching and DNS troubleshooting, see the troubleshooting manual; this page continues with the connection workflow.
Select an entry and turn on the connection
iPhone and iPad: confirm the selection under SERVER before handling system VPN configuration permissions.
You have now saved the server details and chosen a Global Routing mode. Return to Home, find the entry you want to use in the SERVER group, and select it. If a subscription contains multiple entries, choose one and complete the full test before switching. Otherwise, a change in results could be mistaken for the effect of a setting.
- Check the selected server and Global Routing in Home. If the server list is empty, go back to the first step and resolve the import issue; the connection switch does not update subscriptions.
- Turn on the connection switch next to Not Connected at the top. When establishing a connection for the first time, the system may ask to add a VPN configuration. Review the prompt, confirm it is from Shadowrocket, allow it, and complete device authentication if required.
- Return to the app and wait for the Home status to change. If the system permission dialog is still in the foreground, complete or cancel that action first. Do not repeatedly tap the switch across different screens.
Allowing a VPN configuration lets the app handle relevant traffic through the system network mechanism. It does not purchase a service or fill in missing server passwords. If you previously denied permission, turn on the switch again and follow the system prompt. On a managed device, restrictions may require administrator approval; reinstalling the app may not change them.
After the connection status changes, stay on Home and observe it; do not enable On Demand yet. Consider automatic connection conditions after you can reproduce a stable manual connection. Other VPN configurations or tools with similar network-routing functions may affect the current connection. Before testing, make sure another connection is not switching, which can cause the status to fluctuate.
A connected status in Home only means the connection process has reached that state; it does not prove that every destination is accessible. Next, verify the server, destination access, and rule selection separately. If the switch turns off again immediately, go to Step 05 to check permissions and the connection environment.
Test the connection and check whether rules apply
iPhone and iPad: check test results, real access, and matching policies separately.
With the connection switch on, run Connectivity Test in Home and review the result. A test reflects only its specific method and destination: a result does not mean every service is available, and a timeout does not immediately prove the entire server is unavailable. First note the current network, selected entry, and Global Routing, then continue testing under the same conditions.
- Check the basic network first. Temporarily disconnect Shadowrocket and use a browser to visit a page that normally works. If the network requires a login or is not connected, complete network access first; proxy settings cannot replace a Wi-Fi or mobile data connection.
- Test the actual destination. Reconnect, open the page or service you actually need, and repeat an operation such as refreshing the same page. Do not rely on the VPN indicator in the status bar as proof that access is working.
- Check the matching rule last. With Config selected, use the destination domain, time, and policy records in Data to review the request. A page may request several domains; find the record related to the failed action rather than checking only the first item in the list.
If the destination works in Proxy mode but fails in Config, check the current configuration and matching policy first. Common causes include the destination matching DIRECT, rules appearing in an unexpected order, or a policy referencing an entry that is not currently available. If both modes fail, check server authentication, the basic network, and DNS rather than adding more rules straight away.
To reduce cache interference, repeat the same action after each change and, if needed, close and reopen the page being tested. Existing connections may not immediately apply new rules, so no visible change on an already open page does not by itself mean the change failed. Change one variable at a time and note the difference to isolate the setting involved.
If only a particular app fails while browser testing works, first check the actual destination and connection type used by that app. For more on DNS, UDP, speed, and app-specific differences, see the troubleshooting manual. For short answers to common questions, see FAQ.
Check Settings based on where the failure occurs
iPhone and iPad: start at the first failing step; do not change the protocol, DNS, and rules all at once.
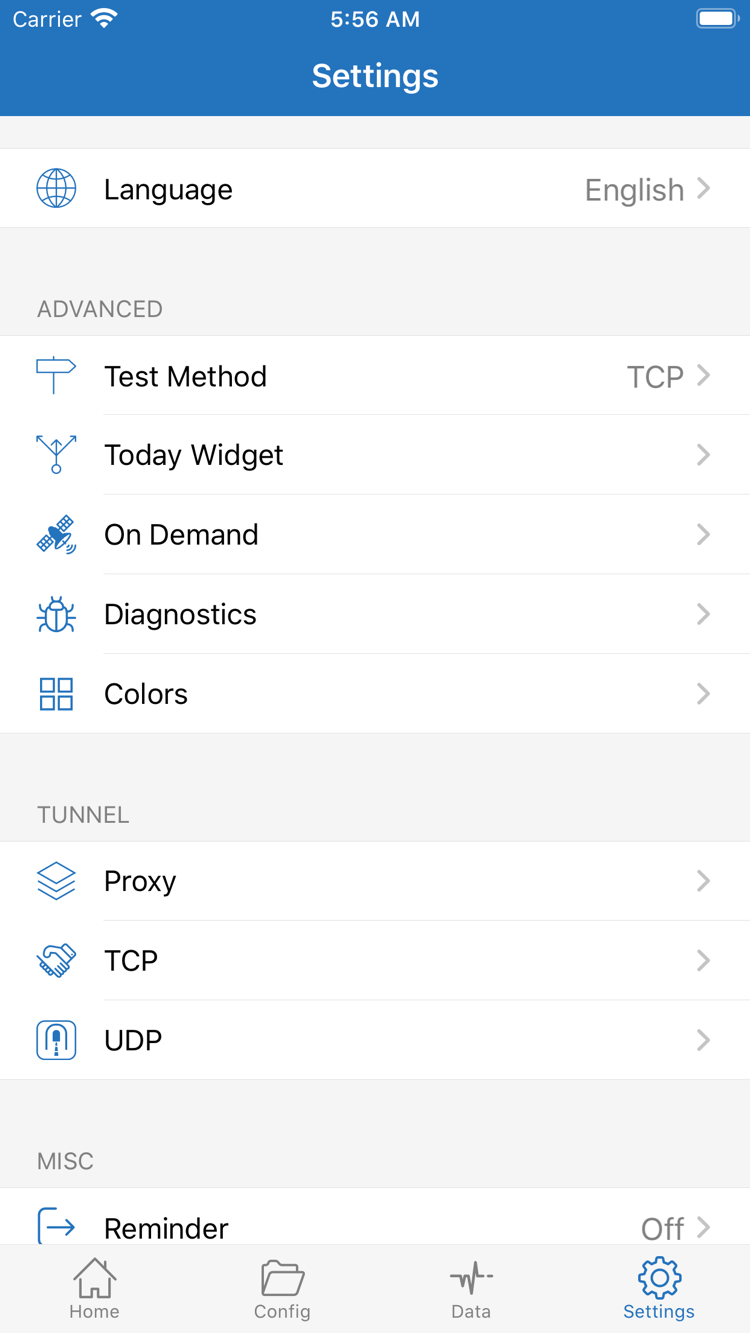
Before opening Settings, describe the issue in one sentence: “subscription update failed,” “the switch turns off immediately,” “the test timed out,” or “only one destination will not open.” These happen at different stages and require different troubleshooting paths. Test Method, On Demand, Diagnostics, Proxy, TCP, and UDP in Settings are separate options; there is no single combination that fixes every issue.
- Import failed: Check that the link is complete, the current network can make the subscription request, and the details are still valid. If entering details manually, check Type, Host, Port, and authentication fields again. If the server list is already populated, do not repeatedly delete the whole subscription because access failed later.
- The switch will not turn on or turns off immediately: First check that the system VPN configuration permission was granted, whether another connection is starting at the same time, and whether the device has management restrictions. If the connection starts again after you turn it off manually, check the conditions under On Demand in Settings. Temporarily disable automatic triggers while troubleshooting, then test manually again.
- Connectivity Test timed out: Check Test Method in Settings and identify the current test method, then compare the result with access to a real webpage. You can compare with another server you already have, but keep the network and test method the same to avoid changing all the conditions at once.
- Connected, but destinations fail: Compare Proxy and Config first, then check the policy record for the relevant destination in Data. If domain access is abnormal while other connections return results, investigate DNS next; do not start by changing multiple DNS settings at random.
- Some apps or connection types behave differently: Check whether the issue occurs only for a particular destination, network, or action. TCP and UDP can behave differently. Base your checks on the capabilities of your existing server and the actual request; enabling one option is not a universal fix.
Use Diagnostics only when you need to investigate further. Keep only the excerpts that show when and how the failure occurred. Before sharing a screenshot or log, hide access tokens in subscription links, authentication details, and destinations that do not need to be public. Diagnostic information helps explain an issue; it should not expose your full configuration.
If the issue appears only after switching between Wi-Fi and mobile networks, return to manual connection settings and repeat Step 04 on both networks. If it started after an app update, keep your current details and check settings one by one; do not delete all configurations without a backup. After making a change, repeat the full sequence—select an entry, connect, test, and access the destination—to confirm the fix is reproducible.
If the cause is still unclear, continue by symptom in the troubleshooting manual. Record the device OS, current network, Global Routing mode, first failing step, and individual changes already tried. This is more useful for narrowing down the issue than simply saying “it won’t connect.”